How to Use Passport Size Photo Maker Online: Complete Step-by-Step Tutorial
Introduction: Make Government-Compliant Passport Photos at Home for Free
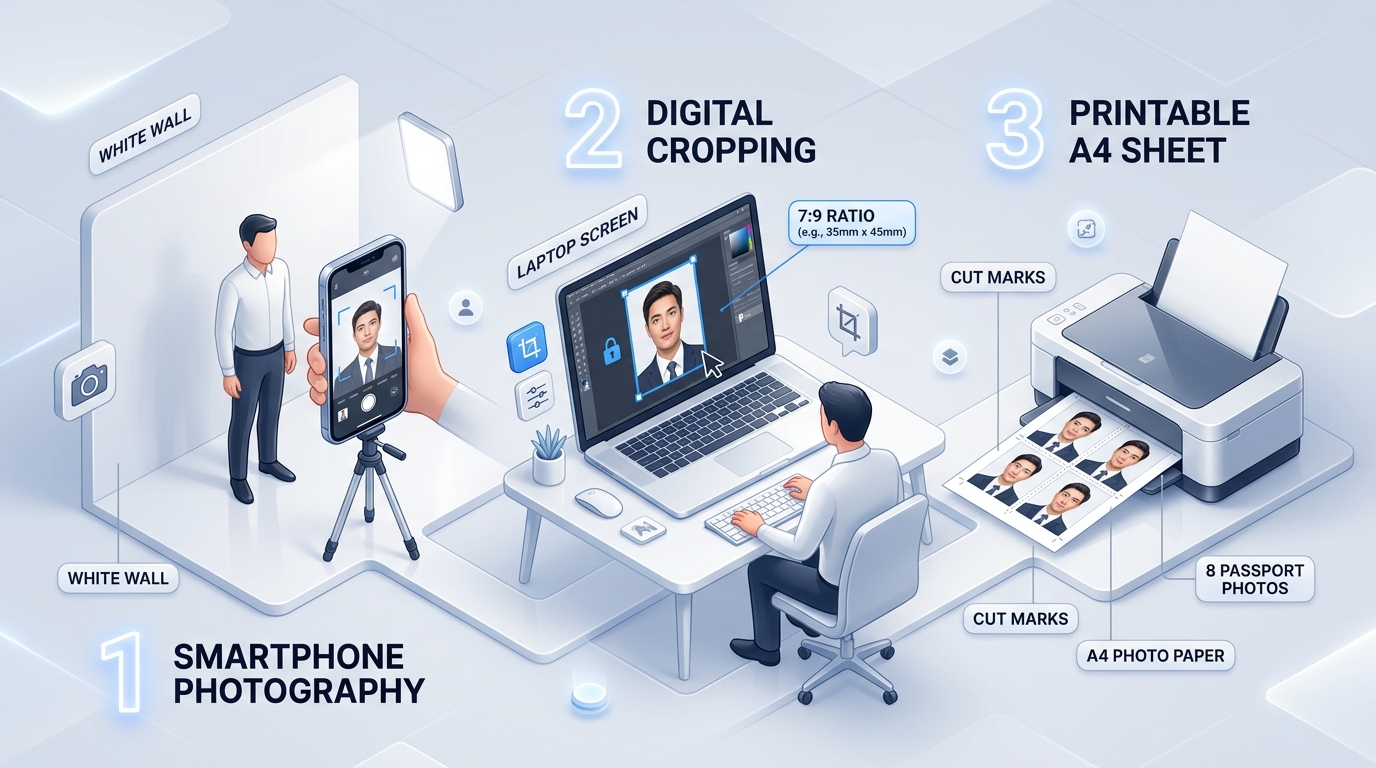
Visiting a physical photo studio or searching for “passport size photo near me” often costs between ₹100 and ₹200 for a few prints, accompanied by long waiting times. With modern smartphone cameras and our dedicated Passport Size Photo Maker Online, you can capture, crop, adjust, compress, and print studio-quality document photos from the comfort of your home in under two minutes—completely free of cost.
In this detailed tutorial, we will walk you through the end-to-end process:
- Setting up the ideal lighting and posture at home.
- Selecting your document standard and locking the exact mathematical aspect ratio (7:9 for India, 1:1 for US Visa, 3:1 for SSC JE Signature).
- Using the built-in smart white background cleaner.
- Using the integrated photo resizer in KB to reduce image size to 20KB, 50KB, or 100KB.
- Generating a ready-to-print A4 or 4×6 inch multi-photo sheet with cut guidelines.
Step 1: Taking the Perfect Photo with Your Smartphone
You do not need an expensive DSLR camera; modern smartphone cameras produce more than enough resolution (12MP to 50MP) for 300 DPI biometric standards. However, following these photography best practices is critical:
1. Lighting and Shadow Control
- Natural Daylight is Best: Stand facing a large window during daytime so soft, diffused natural light illuminates your face evenly on both sides.
- Avoid Harsh Overhead Lamps: Direct overhead bulbs create unflattering dark shadows under your eyes, nose, and chin that will cause passport rejection.
- No Flash: Do not use direct phone flash as it creates harsh reflections on the forehead and red-eye artifacts.
2. Positioning and Background
- Stand approximately 0.5 meters (1.5 to 2 feet) in front of a flat, light-colored or white wall. Standing slightly away from the wall prevents your body from casting a dark outline shadow onto the background.
- Keep your shoulders relaxed and square to the camera. Look straight into the lens with your head upright (not tilted up, down, or sideways).
3. Expression and Accessories
- Neutral Expression: Maintain a relaxed, natural expression with both eyes open, mouth closed, and teeth hidden.
- No Spectacles/Glasses: Consular rules strongly advise removing glasses to eliminate glare and frame obstruction.
- Hair & Ears: Ensure your hair does not cover your eyes, eyebrows, or facial contours. Both ears should preferably be visible.
- Ask Someone Else to Shoot: Avoid front-facing selfies because wide-angle front camera lenses distort facial geometry. Ask a family member to hold the phone at your eye level from 1.5 to 2 meters away.
Step 2: Upload and Select Your Document Preset
Once your photo is captured:
- Open the Passport Photo Maker Online on your phone, tablet, or PC browser.
- Drag and drop your image or click “Click to Upload” to select your picture (Supports JPG, PNG, and WebP up to 10MB).
- Select your desired document preset from the dropdown menu:
- Indian Passport / Aadhaar / Driving Licence: Automatically locks the cropping boundary to an exact 7:9 ratio (35×45 mm / 3.5×4.5 cm).
- US Visa (DS-160) / OCI Card: Automatically locks to an exact 1:1 square ratio (2×2 inches / 51×51 mm).
- PAN Card Form: Automatically sets to 5:7 ratio (25×35 mm) or 213×213 pixels.
- Canada Visa / PR: Sets to 5:7 ratio (50×70 mm).
Step 3: Align Your Face Inside the Biometric Guide
Once the photo is loaded into the canvas:
- Drag to Reposition: Click and drag the photo to place your face directly inside the dotted oval Face Zone guide.
- Zoom Slider: Use the zoom slider to ensure your face (from the bottom of your chin to the top of your hair) occupies 70% to 80% of the frame height for Indian passports, or 50% to 69% for US visas.
- Rotation Button: If your photo was captured at an angle, click the +90° Rotate button or rotate fine-tuning to align your eyes horizontally.
- Brightness & Contrast: Adjust the sliders slightly if your original photo is slightly underexposed.
Step 4: Swap & Clean the Background to Studio White
Official consular standards for India, the USA, Schengen countries, and Singapore mandate a pure, uniform plain white or light background.
If your home wall has subtle shadows, yellowish tint, or wall texture:
- Toggle the “White Background Clean” switch in the control panel.
- Select your target background color (White
#FFFFFFor Light Grey#EFEFEFfor UK/Schengen). - Adjust the Cleanup Tolerance slider to cleanly isolate your hair and shoulders from the wall. The intelligent canvas algorithm replaces background pixels with studio-grade white without affecting your facial features or skin tones.
Step 5: Reduce Image Size in KB with the Built-in Photo Resizer
Online government recruitment and exam portals enforce strict maximum upload sizes. For example:
- Parivahan Driving Licence: Requires file size strictly under 20KB.
- SSC CGL / CHSL / MTS: Requires 20KB to 50KB.
- UPSC OTR Portal: Requires 20KB to 300KB.
- US Visa Portal: Requires under 240KB.
Our built-in photo resizer in KB allows you to:
- Resize Image to 20KB: Move the JPEG Quality slider to ~55-60% to meet strict 20KB limits.
- Resize Image to 50KB: Move the slider to ~75-80% for the optimal balance of crystal-clear sharpness and compact file weight.
- Resize Image to 100KB+: Keep quality at 90-95% for high-definition visa and embassy applications.
- The tool calculates live estimated file weight so you know the exact output size before downloading!
Step 6: Download Single Photo or Generate A4 / 4×6” Print Sheets
You can now choose how you wish to export your final image:
Option A: Download Single Photo (Digital Upload)
Click “Download Single Photo” to instantly save a compliant, high-resolution 300 DPI JPEG image named with your document preset and ratio. This file is 100% ready to upload directly to Passport Seva, UIDAI, SSC, or Visa portals.
Option B: Generate A4 / 4×6” Multi-Photo Print Sheet (Physical Printing)
If you need physical photographs for passport counter appointments or offline forms:
- Click the “A4 / 4×6 Print Sheet” tab.
- Choose your preferred layout:
- 4 Photos Grid (4×6 inch Photo Paper)
- 6 Photos Strip (4×6 inch Photo Paper)
- 8 Photos Grid (4×6 inch Photo Paper — Most popular for studio printing)
- 12 Photos Sheet (Standard A4 Paper)
- 16 Photos Sheet (Standard A4 Paper)
- The tool automatically arranges the photos with proportional scaling, uniform safety margins, and clean dashed cutting guide marks.
- Click “Download Print-Ready Sheet” to save the 300 DPI composite JPEG.
Step 7: How to Print at Home or Local Shop for Just ₹5
To print your downloaded multi-photo sheet:
- At Local Print Shop / Cyber Cafe: Copy the downloaded print sheet JPEG to a USB drive or your phone. Ask the studio to print on 4×6 inch Glossy Photo Paper at normal 100% scale. The cost is typically just ₹5 to ₹10 for all 6 to 8 photos!
- At Home with Inkjet Printer: Open the image in your computer’s photo viewer, select your printer, choose Photo Paper (Glossy), set quality to High (300 DPI), and ensure the scale is set to 100% / Actual Size (Do NOT select “Fit to Page” as that alters dimensions).
- Use a pair of scissors or paper cutter along the dashed guide lines.
Summary: Why In-Browser Privacy Matters
Unlike traditional online photo editors that upload your sensitive biometric selfies to remote cloud servers, passportsizephotoratio.in operates 100% locally inside your web browser. No photos are saved in databases or shared across networks, guaranteeing absolute security and peace of mind for your personal identity documents.
Try the Free Passport Photo Ratio Tool
Check dimensions, calculate pixels, and crop your photo instantly:
Passport Photo Ratio Calculator & Sizing Tool
Calculate exact simplified aspect ratios, millimeter to pixel conversions, and DPI resolutions.
Mandatory official format for Passport Seva Kendra (PSK) & Post Office Passport Seva Kendra (POPSK) applications.
35.0mm × 45.0mm (3.50 × 4.50 cm) simplifies to an exact aspect ratio of 7:9.